• Skip to primary navigation
  • Skip to main content
  • Skip to primary sidebar
  • Skip to footer
  • Home
  • About Me
  • Advertise
  • Contact

I Dig Pinterest

Creative "Pin"-spiration

  • Bloglovin
  • Email
  • Facebook
  • Instagram
  • Pinterest
  • RSS
  • Twitter
  • Recipes
  • Crafts
  • Parties
  • Printables
  • Home Improvement
  • Shop My Style

March 13, 2013

SPRING Blocks

I don’t have a lot of spring decor, so this year I’ve been adding to my collection (much to my husband’s chagrin).

I was inspired by a set of blocks that I found on Pinterest by Not So Idle Hands and wanted to make some like it for myself.  I hosted a ladies’ craft night a few days ago so a few of my friends could make some too.  We had a great time chatting, laughing and creating.

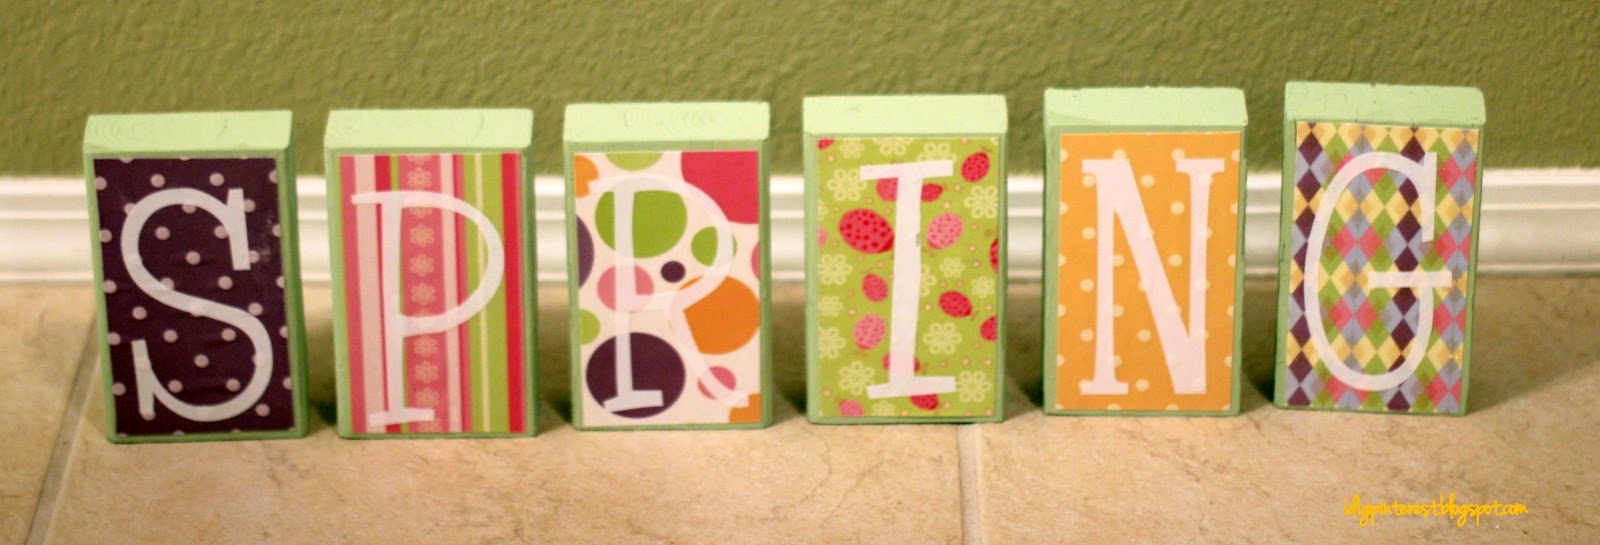
This is one of those projects that is quick and pretty much impossible to mess up.  If you make this in a group, it’s a very inexpensive craft!  You could also be super thrifty if you want and paint the backs of the blocks different colors and apply the letters for “SUMMER”.  Then you could just turn them around for the next season!  It works out perfectly!

 They are such a colorful, fun decoration.  Bring on spring!


Here are the cute sets that my friends made:


{MATERIALS}
2X4 cut into 6 pieces, each measuring 5.5″
Sandpaper
Paint
Scrapbook paper (optional)
Modge Podge (if you are using patterned paper)
Vinyl or Chipboard letters
  1. Cut 6 pieces of wood measuring 5.5″ x 3.25″.  Or just buy a 2×4 at Home Depot and they will do your cuts for free. 🙂
  2. Sand and paint your wood.  Let dry and then sand around the edges of the blocks, if you want, to add a decorative touch.
  3. (Optional): Cut paper to be slightly smaller than the size of your blocks if you want the paint color to show around the edges.  Using Mod Podge, adhere paper to the faces of the blocks.
  4. Apply vinyl or chipboard letters.  I cut my letters out on my Silhouette using the “CAC One Seventy” font.  My letter sizes were 5″ x 2.5″.
  5. Mod Podge over the top to add a protective layer, if you like.
That’s it!  Aren’t they so fun?Do you decorate for Easter?

I linked these up at Huckleberry Love.

Filed Under: Crafts, Easter, Silhouette Projects, Uncategorized

Reader Interactions

Comments

  1. Shannon {Cozy Country Living} says

    March 13, 2013 at 1:33 pm

    Aww, I really like these! Very cute:) You could make these for every season!
  2. Amy @ The Happy Scraps says

    March 13, 2013 at 1:43 pm

    I love your blocks! I love the simplicity of just having them painted. The font you used for your letters looks great as well. :)
  3. Laurie@SimplyCreatingHome says

    March 13, 2013 at 7:57 pm

    Darling letters and so colorful and fun for spring!
  4. Pam McFarland says

    March 13, 2013 at 8:44 pm

    I love the simply painted version....so eye catching. Great job!
    Pam @ The Patriotic Pam
    • Pam McFarland says

      March 14, 2013 at 11:27 pm

      My link party just went live, I would love for you to come over and share these.
      Pam @ The Patriotic Pam
  5. M.J. Powell says

    March 14, 2013 at 4:48 pm

    Oh these are all fun. I love to decorate for all the holidays and seasons.
    Our party is live now, and we would like to invite you to share this there: http://thebusybhive.blogspot.com/
    Hope to see you there.
    Thanks!
    The Busy Bee's,
    Myrna and Joye.
  6. Jodi Stuber says

    March 14, 2013 at 8:54 pm

    I totally love these .. so colorful and cheery! Stopping from the busy bees
  7. Epic says

    March 14, 2013 at 10:22 pm

    How cute are those blocks...Love it!
    Cheers,
    Char
    http://1epicmom.com/2013/03/14/cruising-with-kids-series/
  8. Katherines Corner says

    March 16, 2013 at 1:34 am

    this are adorable! Thank you for sharing your lovely blog at the Thursday Favorite Things blog hop xo
  9. Leslie @ Violet Imperfection says

    March 18, 2013 at 2:25 am

    So cute! I love them!

    Thank you for linking up to Raising Imperfection!
    Make sure to check back on Friday to see if you were featured.
    Leslie
    www.violetimperfection.com
  10. Sisters Playing House says

    March 18, 2013 at 2:07 pm

    This is great!! I am going to get my husband to cut up some of the scrap wood that he has in the garage and pick up the rest of the supplies this week to make this! Thank you so much for the tutorial.
    http://sistersplayinghouse.blogspot.com/
  11. Andrea @ Decorating Cents says

    March 19, 2013 at 3:22 pm

    These are really cute. I've been wanting to do something like this for a while. I do believe there are some 2x4's in the garage.
  12. Jamie says

    March 19, 2013 at 10:08 pm

    These are so cute! I love all the different variations your friends made! I would love it if you would come and link these up on our linky party!
    http://www.huckleberrylove.com/2013/03/much-ado-about-monday-link-party-no-1.html#comments

    Hugs & Smiles,
    Jamie
    www.huckleberrylove.com
  13. Miranda @ Someday Crafts says

    March 20, 2013 at 3:15 am

    These are darling!! I love the colors you used - very appropriate for spring!! This was the most viewed link at the Whatever Goes Wednesday link party last week at Someday Crafts. It will be featured in tomorrow's party, so come by and take a look (and link up again :))!!!
  14. Craftynight owls says

    March 20, 2013 at 5:05 am

    These are adorable and I love your choice of colors. Thanks for sharing
    Carrie - www.craftynightowls.blogspot.com
  15. Katie from Katie's Nesting Spot says

    March 20, 2013 at 6:25 pm

    Thank you for sharing your SPRING signs with us. I love a good craft night! I'm hosting another one soon and we may just have to make this! Do you have a time estimate of how long it took to do them? We meet in the afternoon when the kids are at school and only have a 2 hour or so time block to work with. I featured you in this week's A Crafty Soiree post, which will be up at midnight EST and I hope you'll stop by to see it and share more of your crafty skills with us!
    • Christine Bell says

      March 20, 2013 at 11:33 pm

      Hi Katie! Two hours should be plenty of time, if you stay on track. :) The most time consuming part is waiting for the paint to dry.
  16. Jamie says

    March 24, 2013 at 6:34 pm

    Thanks so much for linking up to our Much Ado About Monday party! We would love for you to come back next Monday to link up your newest creation! :)

    Hugs & Smiles,

    Jamie
    www.huckleberrylove.com
  17. Erin says

    March 26, 2013 at 8:39 pm

    Love the colors you chose and it's just genius to use the same blocks for summer!

Primary Sidebar

Hi! I'm Christine, and I'm addicted to Pinterest! I love sharing creative "pin"-spiration by way of delicious recipes, fun crafts, party ideas, and DIY projects. I hope you'll stop by often!

Follow by email…

Popular Posts

  • Soft & Chewy Gingerbread Oatmeal Sandwich Cookie Recipe
  • Hamburger Corn Casserole
  • No Bake Cherry Cheesecake
  • Creepy Crawly Spider Wreath
  • Peppermint Sugar Cookies and Kids’ Charity Donation Opportunity
  • The Best Chocolate Chip Zucchini Bread

Footer

Mom It Forward: Blogger Network
Privacy Policy

Copyright © 2025 I Dig Pinterest · Implemented by WPopt

MENU
  • Home
  • About Me
  • Advertise
  • Contact
  • Recipes
  • Crafts
  • Parties
  • Printables
  • Privacy Policy