• Skip to primary navigation
  • Skip to main content
  • Skip to primary sidebar
  • Skip to footer
  • Home
  • About Me
  • Advertise
  • Contact

I Dig Pinterest

Creative "Pin"-spiration

  • Bloglovin
  • Email
  • Facebook
  • Google+
  • Instagram
  • Pinterest
  • RSS
  • Twitter
  • Recipes
  • Crafts
  • Parties
  • Printables
  • Home Improvement
  • Shop My Style

April 3, 2013

Baby Carseat Cover Tutorial


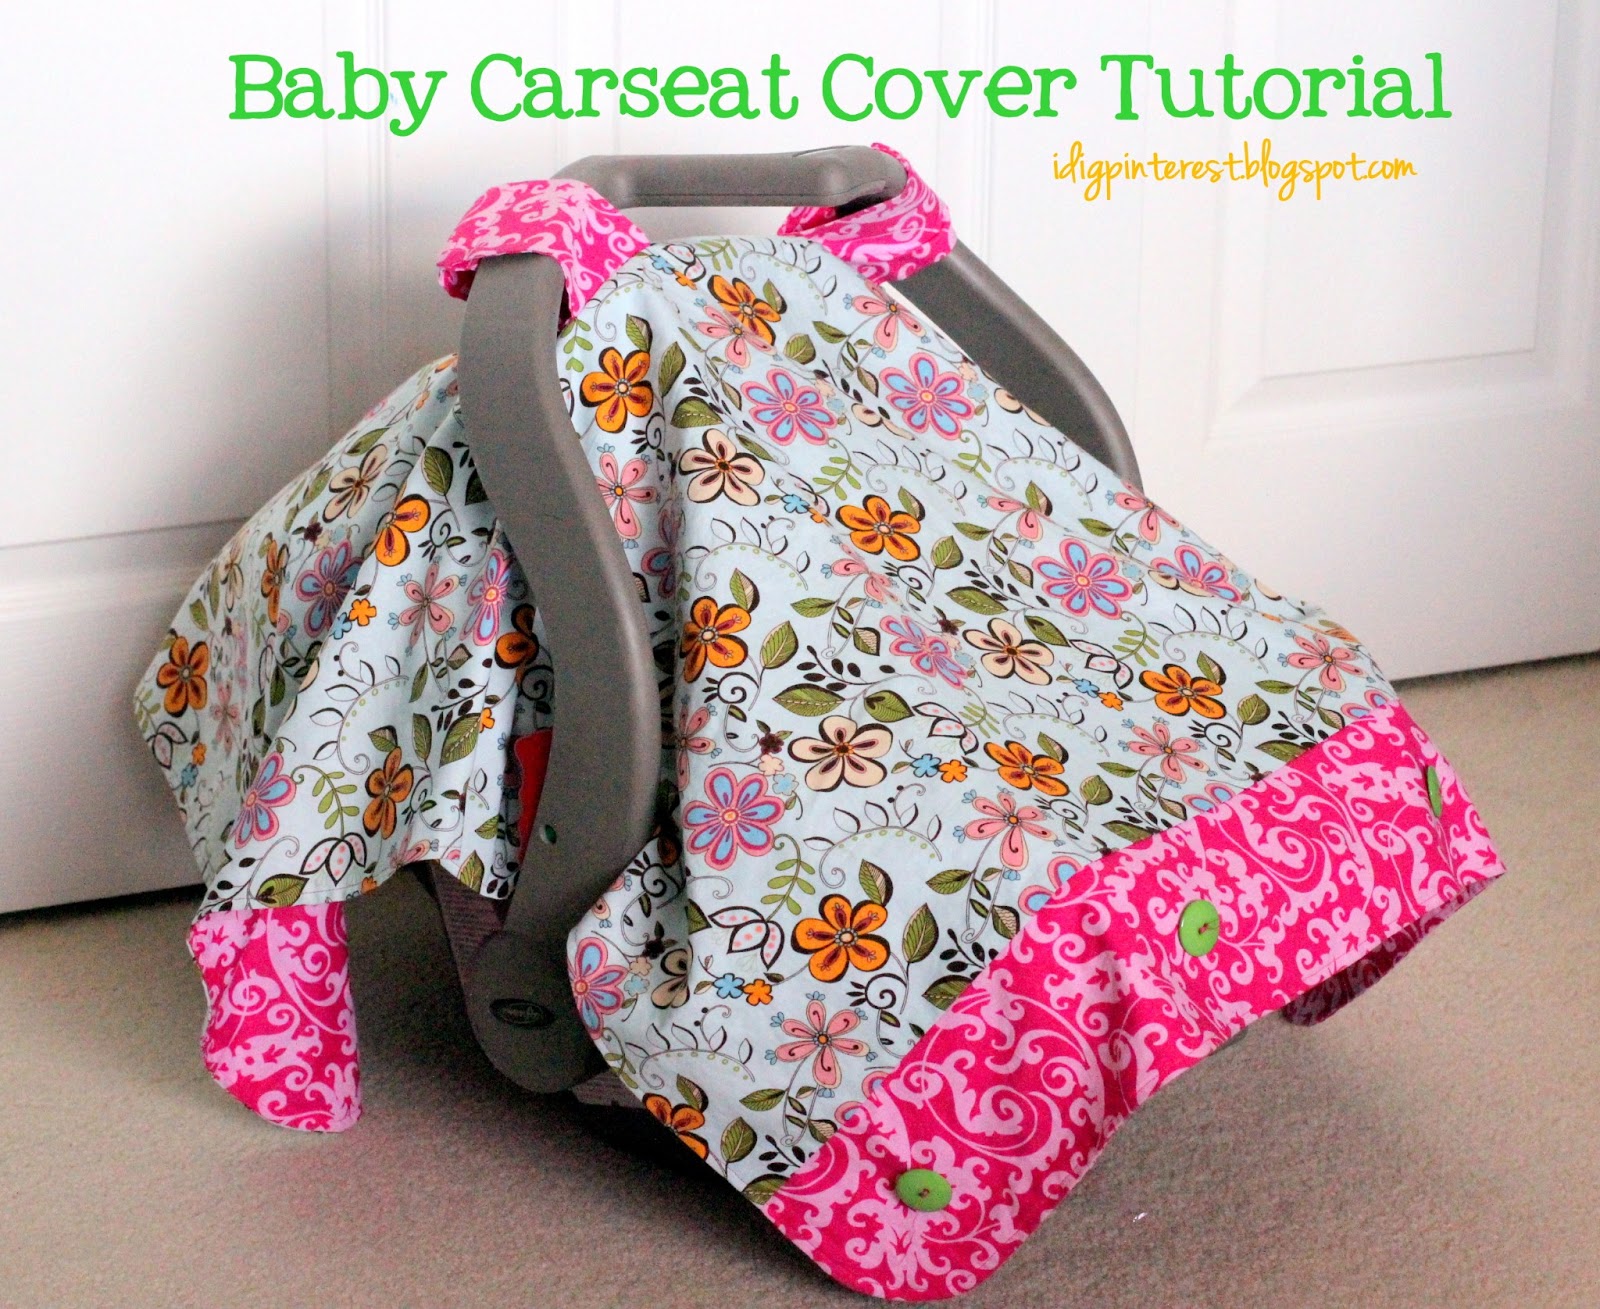
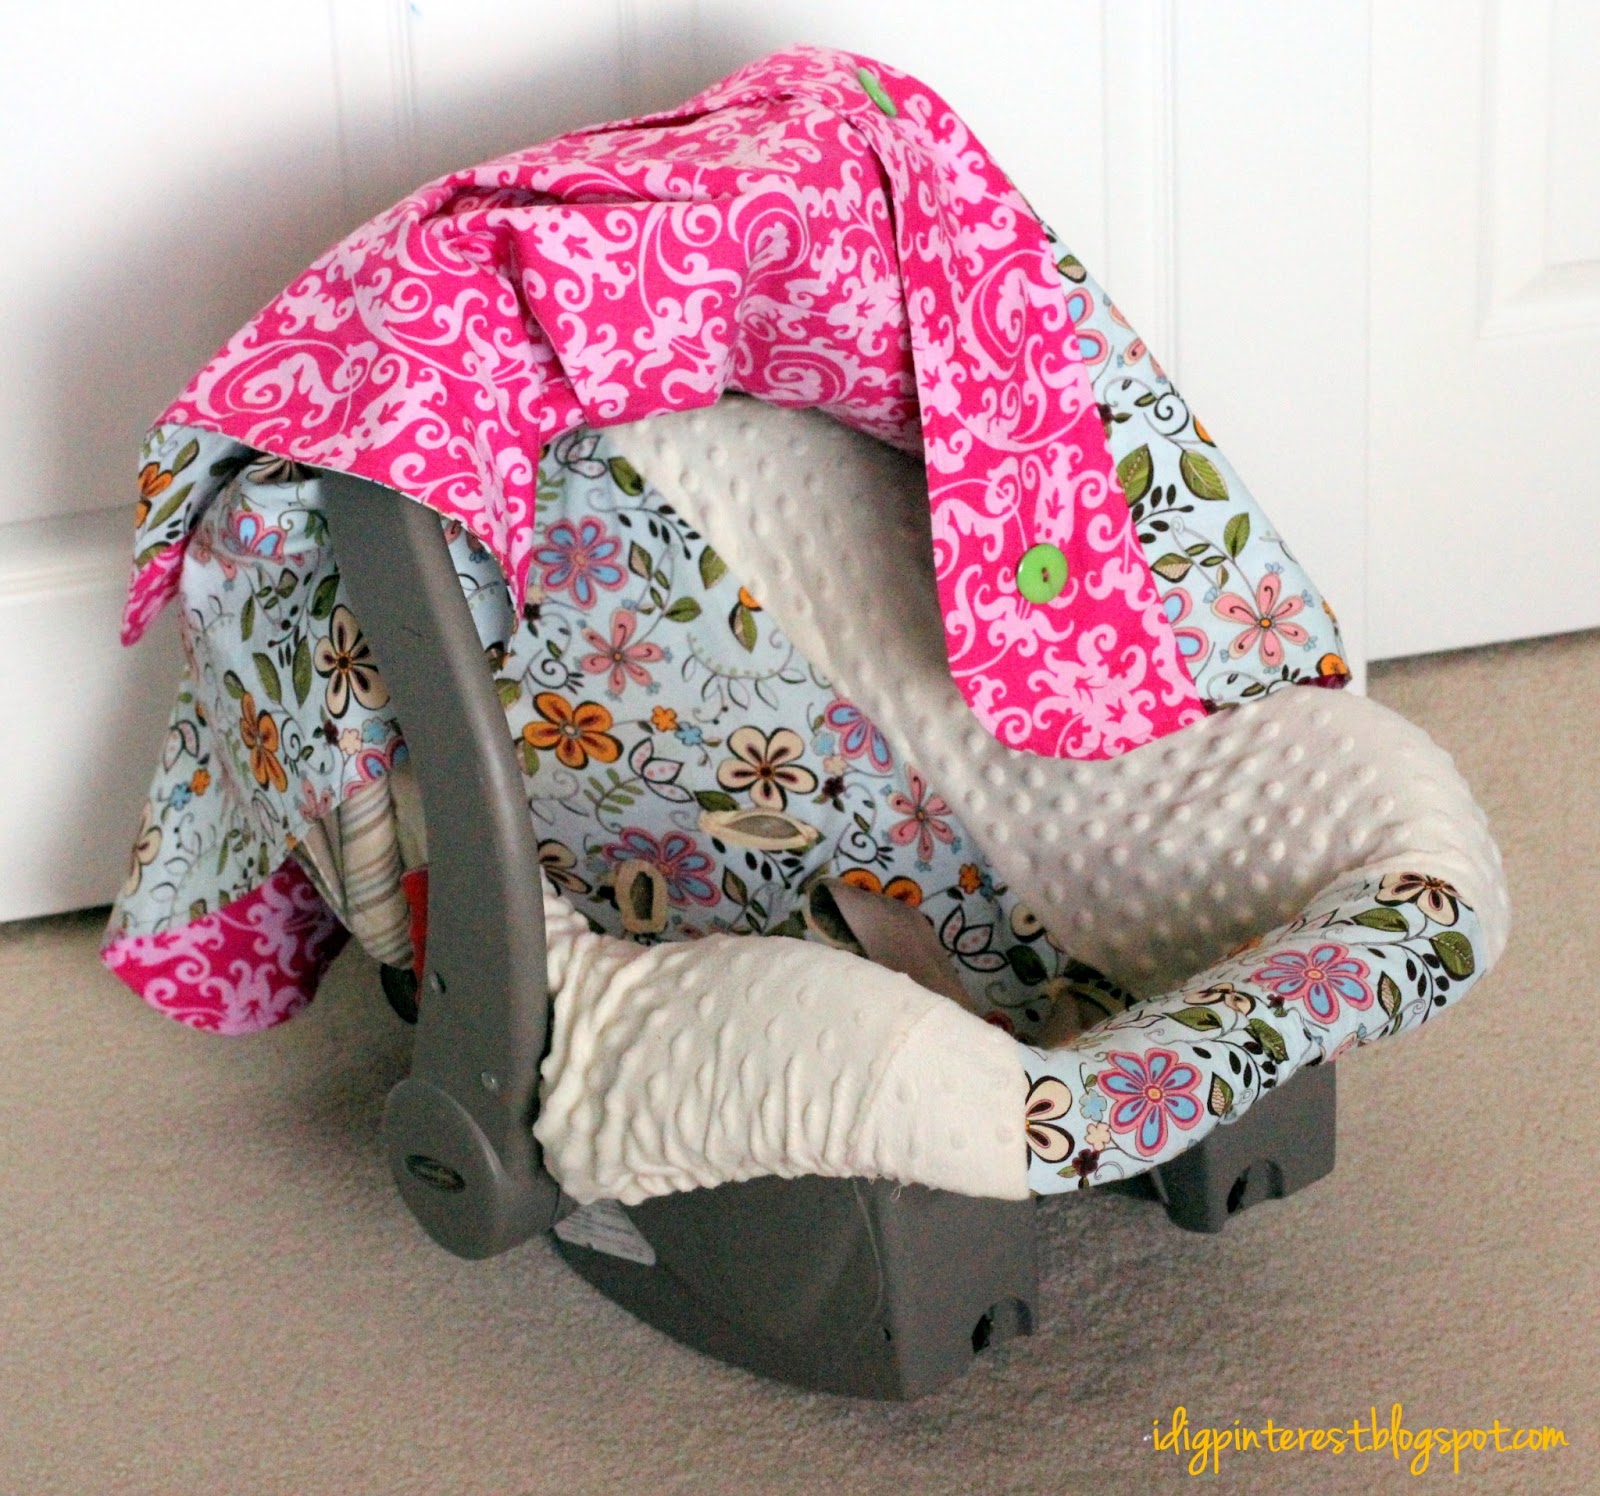
When I found out that I was having a baby girl about a year ago, I decided to put my limited sewing skills to the test and make a cutesy covering for her carrier.  I searched Pinterest for covers that would be easy to make, but would have a little extra pretty flair.

I found this fabulous tutorial.  I added in the big green buttons and I made the Velcro straps slightly different than the original.  You can embellish it (with buttons, rick rack, ribbon, etc.) as much or as little as you like!

I’ve gotten so many compliments on it.  I love that I can put baby in her “cave” when she’s sleeping and it offers a shield from peekers and pokers while we’re out.  And she sleeps longer when she’s in it because it’s darker in there.

These make fantastic gifts, also!  Before I started sewing, I got so excited when someone gave me something like this that I couldn’t make for myself.

I made this before I started my blog, but check out Make-it-Do if you’d like step-by-step pictures of the process.


{MATERIALS}
 
1 1/3 yards cotton or flannel fabric for the top
1 1/3 yards cotton or flannel fabric for the backing
Sew-on Velcro (don’t get the sticky kind because it may gum up your machine)
Fabric Marking Pen or Pencil
  1. Cut top and backing fabrics 35″ wide and 42″ long.  Be sure to cut directional fabric in the right direction.  I pieced the top by cutting a strip of the backing fabric and sewing it onto the top piece.  If you do this, just make sure that your finished dimensions are 35″ wide and 42″ long.
  2. Create curved corners by placing a large bowl in the corner and tracing around it with your fabric marking pen or pencil.  Cut along traced line.  The rounded corners keep the cover off the floor, so they are functional and decorative.
  3. Cut straps 2 from backing and 2 from top (or four from your backing like I did), 4″ x 9 1/2″.   If you want to do any piecing, just make sure the finished dimensions are 4″ x 9 1/2″.
  4. For the main body of the cover, place right sides of front and backing together and stitch together using 1/4″ seam, leaving a small opening.  NOTE: All seams are 1/4″ unless otherwise noted.
  5. Clip curved corners and turn right side out.  You can use a chopstick or a butter knife all the way around the seam for a nice edge.  Iron flat.
  6. Using a scant 1/4″ seam, topstitch all the way around the outside edge to give it a nice, finished look, and to close the small opening.
  7. To make the straps, place the right sides of front and back together (or the right sides of the backing fabric together like I did).  Stitch around, leaving one end open.
  8. Clip corners and turn right side out.  Again, use a chopstick or butter knife for nice edge.  Iron flat.
  9. Close the opening.  Repeat steps 7-8 for the second strap.
  10. Fold straps to check placement of Velcro.  Pin and stitch Velcro into place.  Make sure the end where you stitched closed is on the inside and therefore will be hidden.
  11. Press the straps in half to act as a guide.  For placement of stitching on the straps, (to attach the straps to the body of the cover), measure 4 1/2″ in from both sides, and draw a line with fabric marking pen. **If your carrier is a different design like mine was, you may need to measure where to put the straps by hand to ensure they end up in the right place.
  12. For placement of straps, measure 19″ from the top and 11 1/2″ from each side.  There should be about 5 1/2 ” between each strap and about 21″ from the strap to the bottom.  If you’re a visual person, see this illustration for strap placement.
  13. Pin straps into place.  Stitch and then reinforce stitching.  The stitching will be 1″ apart, and I stitched in a box shape.
You’re done!
I re-covered the inside of my carseat also, but I’ll save that tutorial for another time.
What do you think?

Filed Under: Sewing Projects, Uncategorized

Reader Interactions

Comments

  1. Chelsea@getyourcraptogether says

    April 3, 2013 at 4:01 pm

    This turned out great! I made one similar for my little one this past year. I love it! Good job!

    I'd love for you to check out our Pattern Party! We invite those with free patterns or templates to share. We are also having a giveaway this week!
    http://getyourcraptogether.blogspot.com/search/label/Pattern%20Party
  2. Kristina says

    April 3, 2013 at 7:54 pm

    You did GREAT! So cute. I wish mine turned out that good.
  3. Sarah Larsen says

    April 4, 2013 at 12:18 am

    Adorable!!! I just found your blog and I LOVE it! :)

    I just started my own little "Pinteresty" blog. I would love for you to follow me back so that we can continue to share ideas!
    http://naptimenothings.blogspot.com/

    Your newest follower,
    Sarah @
    Naptime Nothings
  4. Al Shaffer says

    April 4, 2013 at 5:37 am

    I love the car seat cover! It looks so comfy and cozy. I am a major fan of minky. It reminds me of the minky crib sheet my sister made for my son and her little girl (http://shaffer-sisters.blogspot.com/2012/06/snug-as-bug-on-rug-minky-minkee-crib.html). You have a cute blog. We are your newest follower. Feel free to check out our blog. I'm pretty sure you will love it. We also love to sew for our kids, cook delicious food, and silhouette projects.
    Al @ shaffer-sisters.blogspot.com
  5. KC Coake says

    April 4, 2013 at 3:38 pm

    It is sew (hehe) cute! If I had a little baby again, I would love to make one of these.
    Thanks so much for linking up at the Real Family Fun link party! Hope to see you next week.
    KC
  6. Reduce, Reuse, Renewed says

    April 4, 2013 at 6:30 pm

    Ohhh! I like it! I want to make a ladybug one for my next baby. Thanks for the tutorial. Pinning to my Crafts to Make board.
  7. Danielle Wood says

    April 4, 2013 at 9:57 pm

    Love this - I'm for sure making one when we have kids!! Thank you for linking up at the Pinterest Power Party!!

    Danielle
    SewMuchCrafting.com
  8. The Thriftiness Miss says

    April 5, 2013 at 6:15 am

    This is adorable! I love the fabric you choose too.. Pinning to my sewing board :)
  9. Jerri Rivers says

    April 6, 2013 at 6:48 am

    This is so cute! I love it! Thanks for linking up with me for Friday Favorites. I'm featuring you next week!
  10. mail4rosey says

    April 7, 2013 at 6:06 pm

    This is great and I'm going to share it w/my daughter-in-law who is expecting.
  11. Jamie says

    April 9, 2013 at 3:57 am

    This is so cute. The colours are so pretty! I would love for you to come and share this at our Monday link party!

    http://www.huckleberrylove.com/2013/04/much-ado-about-monday-no-4.html

    Hope to see you there,
    Jamie
    www.huckleberrylove.com
  12. Monica Pruett says

    April 10, 2013 at 4:47 am

    That is an adorable cover! Thanks for linking up at Family Fun Friday.
    Sincerely,
    Monica
    http://happyandblessedhome.com
  13. My name is Rita says

    April 10, 2013 at 7:06 pm

    This is adorable. I would have loved one of these with my babies. If you get a chance, please share this on my linky party: http://suburbsmama.blogspot.com/2013/04/sunday-linky-party-2.html
  14. Lydia says

    April 12, 2013 at 3:58 am

    I am totally pinning this! Great job and super cute! I will be making one for when my little one gets here! I can't wait to see how you re-covered the inside of your car seat too! Thanks for sharing over at Much Ado About Monday link party!
  15. Mackenzie says

    April 12, 2013 at 8:48 pm

    I LOVED having one of these for our second child! Saving this for a gift idea; thanks! :) Thanks for sharing last week on Saturday Show & Tell on Cheerios and Lattes! You are a Featured Favorite this week! We loved having you join us last week and can't wait to see what you've been up to this week!
    Have a great weekend!
    Mackenzie :)
  16. Kim Tritz says

    April 14, 2013 at 12:28 am

    How adorable! I never used one of these with our first child for some reason, but now that the 2nd is on the way, I think I'll be making one for sure... even if it's just for the adorable-factor. I also love how the car seat cover turned out! I was a co-host for Wow Me Wednesday, and I've featured your post! Stop by and check it out :) http://www.twotendesigns.com/2013/04/wow-me-wednesday-link-party-features.html

    Thanks for sharing!
    Kim @ Two Ten
    www.twotendesigns.com
  17. Anonymous says

    April 29, 2013 at 11:12 pm

    I made this too! I used the fabric that matched my son's nursery. I made curved corners. I just used a big pasta bowl to get the right amount of curve. It makes a great blanket to lay the baby on once you get to the destination as well. So happy when I realized that. Helps on the amount of Stuff that moms always need to have. the car seat cover looks great too.
  18. chrysler seat covers says

    June 21, 2013 at 1:45 pm

    It is so cute to have these kinds of design.
  19. Nicole Sorensen says

    July 18, 2013 at 12:31 pm

    I love the look of your car seat that you covered (not the canopy, but the actual car seat)...and I'm looking into making one for my new baby due in October. I haven't been able to find the tutorial for the car seat cover. If it's not on here yet, could you possibly email me the link to the pattern where you may have found your inspiration? Thanks! lachilena.king@gmail.com
  20. Harry Peter says

    May 31, 2016 at 11:36 am

    The cotton material is soft and seems to wick away the moisture nicely. The cover is thick so its a nice cushion for baby.

    Custom Made Car Seat Covers
  21. Annaz Anna says

    September 9, 2016 at 4:37 pm

    Hey! thanks for share it with us, It is very important for me
    Please click here blog car

Primary Sidebar

Hi! I'm Christine, and I'm addicted to Pinterest! I love sharing creative "pin"-spiration by way of delicious recipes, fun crafts, party ideas, and DIY projects. I hope you'll stop by often!

Follow by email…

Popular Posts

  • Cadbury Mini Egg Cookies
  • Chicken Fajita Casserole
  • 25 Easy and Delicious Meals to Bring to Friends in Need
  • Hamburger Corn Casserole
  • Hamburger Hash Brown Casserole
  • Built-In Linen Cabinets Update

Footer

Mom It Forward: Blogger Network
Privacy Policy

Copyright © 2021 I Dig Pinterest · Implemented by WPopt

MENU
  • Home
  • About Me
  • Advertise
  • Contact
  • Recipes
  • Crafts
  • Parties
  • Printables
  • Privacy Policy